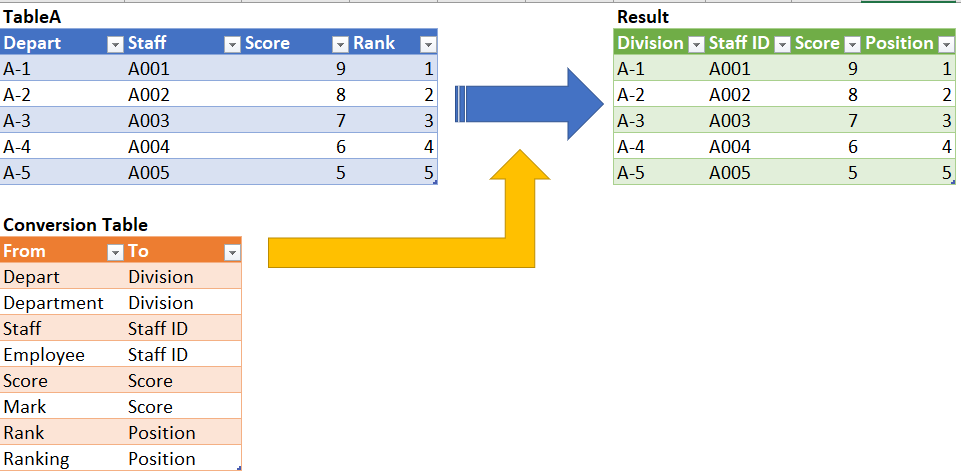
Situation:
We have many different tables to be appended. It should be a simple task with Power Query. You may refer to my blogpost here for the basic of appending tables with Power Query. Nevertheless, life could be challenging in workplace. What if the tables do not have consistent column names? We need to convert all the column names into common names before appending tables. Are we going to read and rename all column names table by table, manually? Of course not! And this is exactly the reason for this post! 😉
Inspirations and the Thinking Process:
Before jumping to the solution, I would like to share with you the inspirations and the thinking process behind the scene.
Indeed, I came across this topic from a video by Leila Gharani. In the video she demonstrated how to solve the problem in a very elegant (and advanced) way with M code using the function List.Accumulate. You can see the formula she used in the following screenshot.
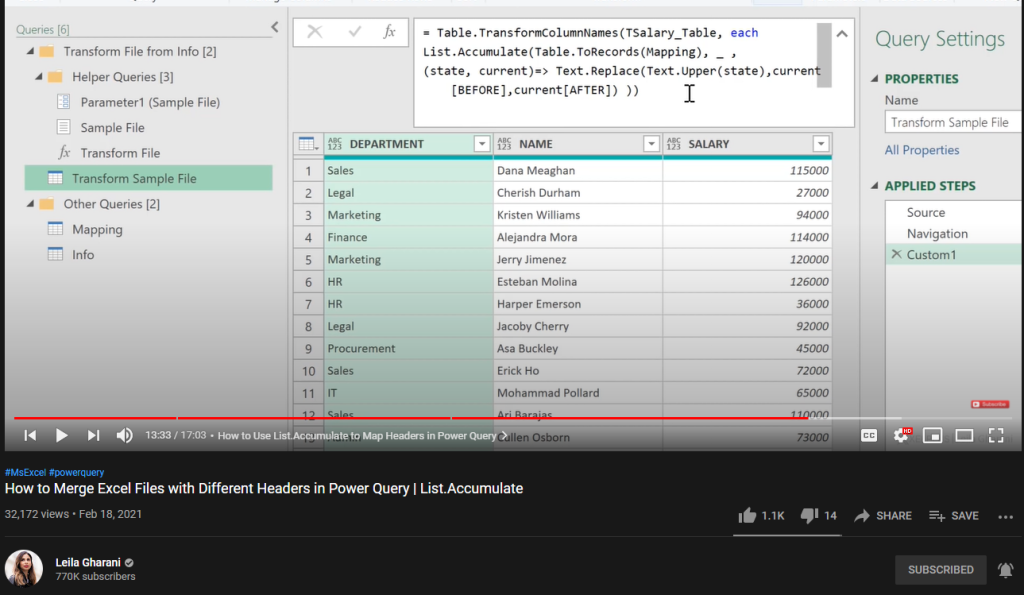
To be perfectly honest, it is out of my comprehension. I watched the video a couple of times. I kind of understand it while she explained along but I knew I could not write that formula by myself. It’s still a long way for me to do so. 😅
I love Power Query because it empowers non-programmer like me to do super powerful stuffs.
So, I have been thinking for quite a long time: Can I solve the problem
- by using mainly elements on the user interface of Power Query Editor…
- without using advanced M code…
- well, probably with some simple formula (basic M code)?
Then I started doing experiments (or put it in other words, trial and error). The first thing I did was to examine the code auto-generated when I renamed columns manually.
= Table.RenameColumns(Source,{{"Depart", "Division"}, {"Staff", "Staff ID"}, {"Mark", "Score"}, {"Rank", "Position"}})
Well… it seems to be a simple line of code. The function involved is Table.RenameColumns. Then I further drilled into the description of the function which requires two parameters:

- table as table
- renames as list
umm… what does that mean?
The first parameter is simple. It’s a table. Usually it refers to previous step (but not necessary).
But what about the second parameter? A list of two values, provided in a list?
Let’s look at the auto-generated code again:

A list is enclosed by a pair of { }. The code above contains a list of list. I realized that as long as I can create a dynamic list of list (with two values) and then feed it into the second parameter of the function, I should be able to rename columns in a dynamic way, with the help of a conversion table.
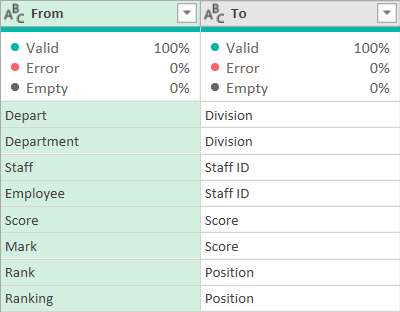
I know how to convert a column into a list. That is super easy by using Convert to List on the Transform tab of Power Query Editor.

However, there is no easy way to convert two columns into a list of list.
I tried many different ways without success. I was a bit frustrated. I wondered if that’s possible, Leila should have done it and demonstrated it in another video. So I gave it up. 😁
Then today I came across a video by Oz from Excel On Fire. Indeed It has nothing related to the problem we discussed above. In the video Oz showed how to split text from a column using the function Text.Split. At 2:08 in the video, after he added a custom column using Text.Split, the result showed on the screen was the light-bulb moment to me!
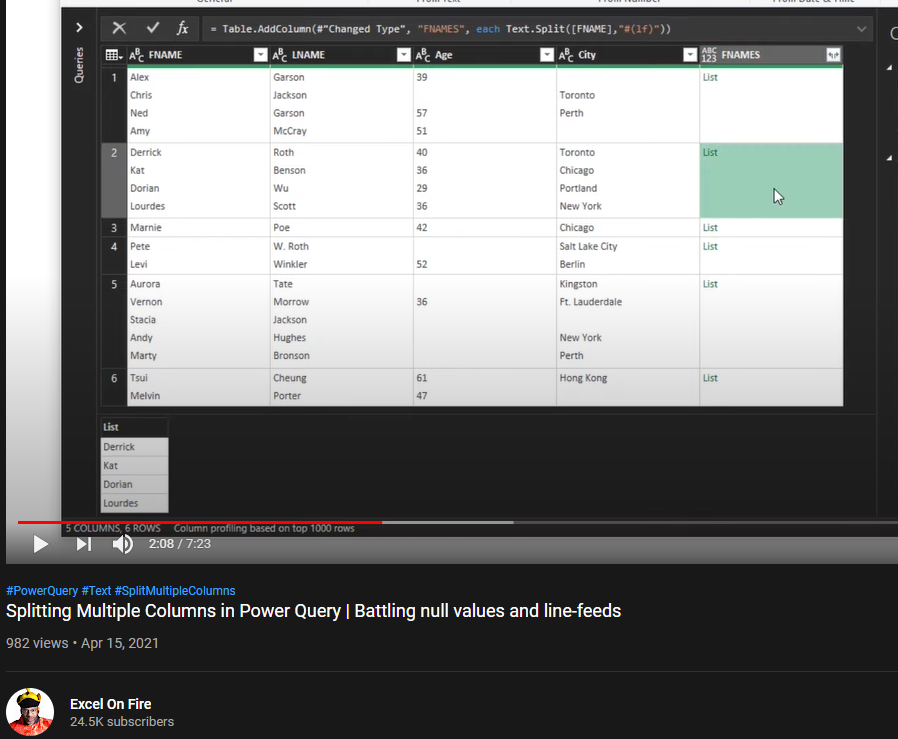
Did you see that? The result returns a List. Bravo! This is exactly what I need. I can’t stop myself from testing it in Excel. It works!
Solution
It’s time to show my solution. If you are still with me, I expect you have some knowledge in Power Query. Therefore the following will not be a step-by-step tutorial but the key transformation steps required.
You may download a sample file to follow along.
First thing first. Load the tables to Power Query.
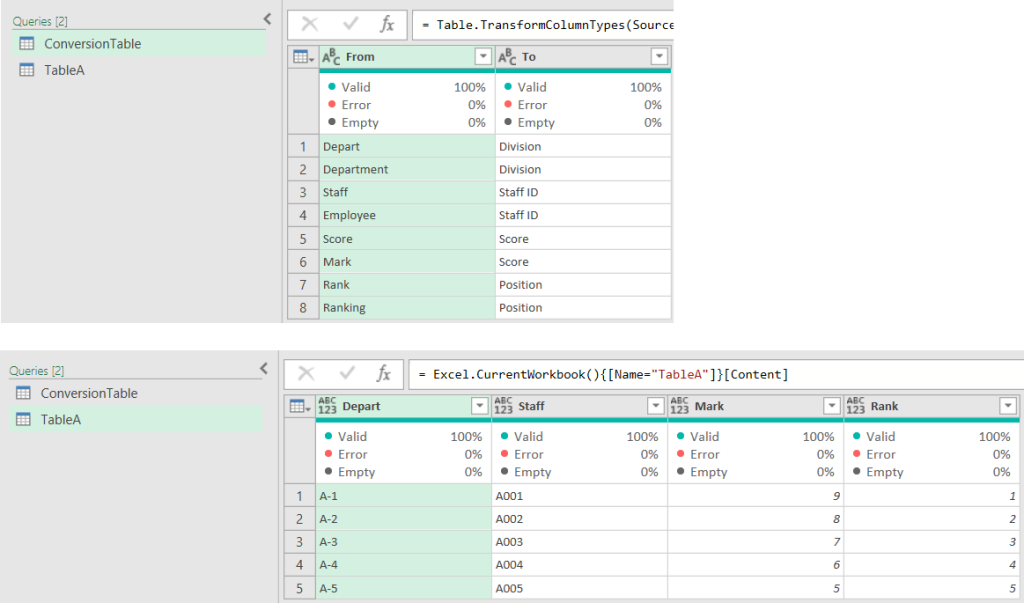
Now we have TableA, i.e. the table with headers needed to be changed, based on the content in the Conversion Table.
Get the column names of TableA
To get the column names of TableA, I added a custom step by using the following formula:
= Table.ColumnNames(Source)

The result was a List. I turned the resulting list to a Table.
Get the “New” Column Name by Merging Query
I performed a Left-Outer Merge with the Conversion Table, as shown below:
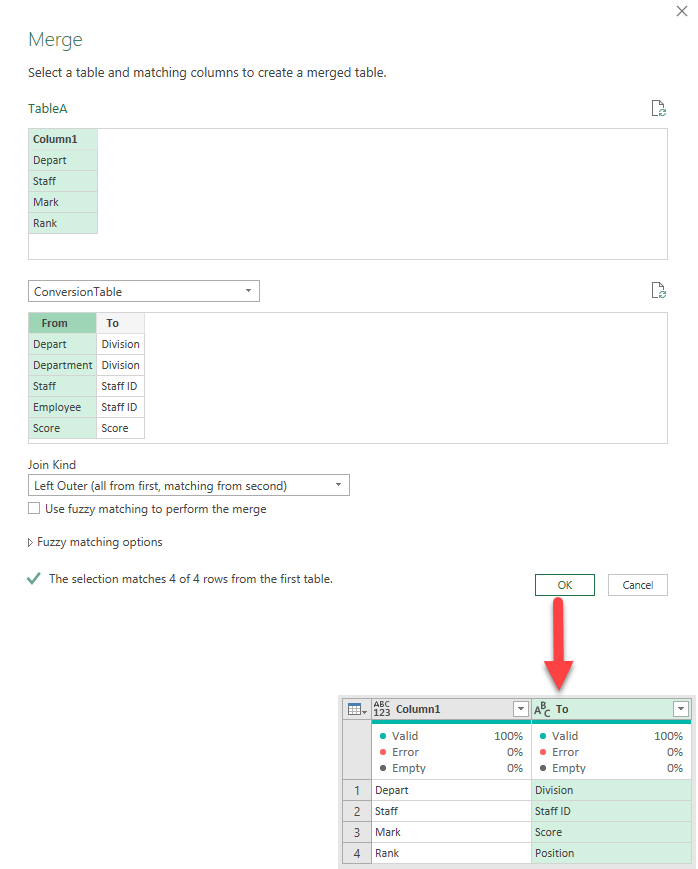
Convert the two columns into a list of list (with two values)
Here’s the tricky part that I got stuck for long, until I watched Oz’s video.
In order to create the list of list, I merged the two columns first.
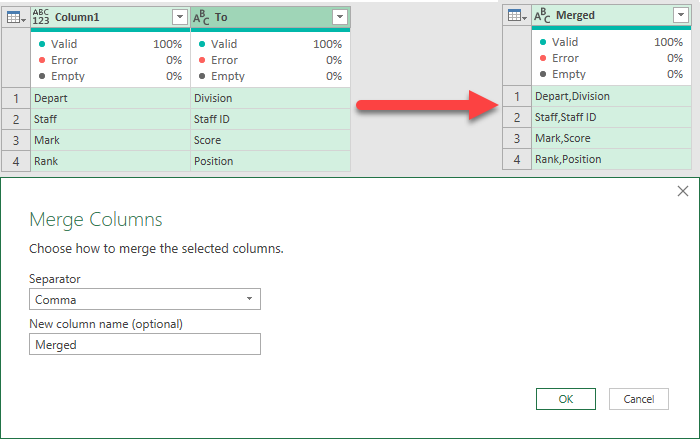
Then, I split it by adding a Custom Column using the function Text.Split.
Here’s the formula used for this step:
= Text.Split([Merged], ",")
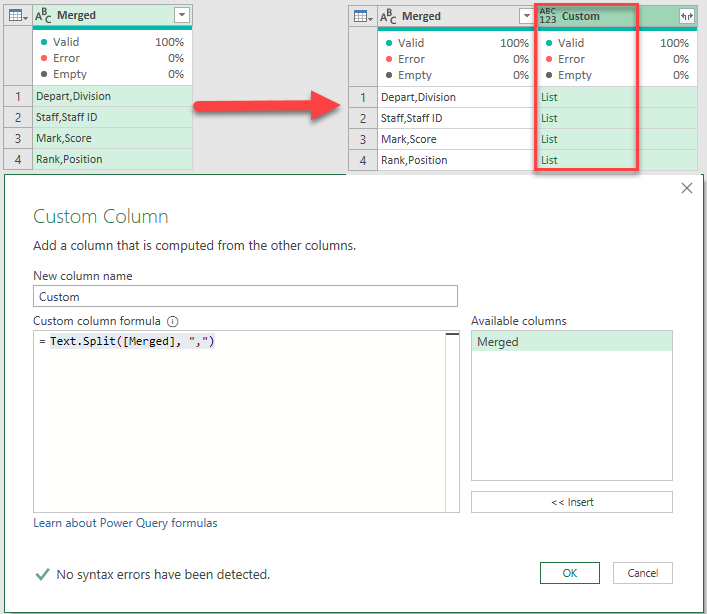
Now I’ve got a list of two values. The next step is get create a list of list.
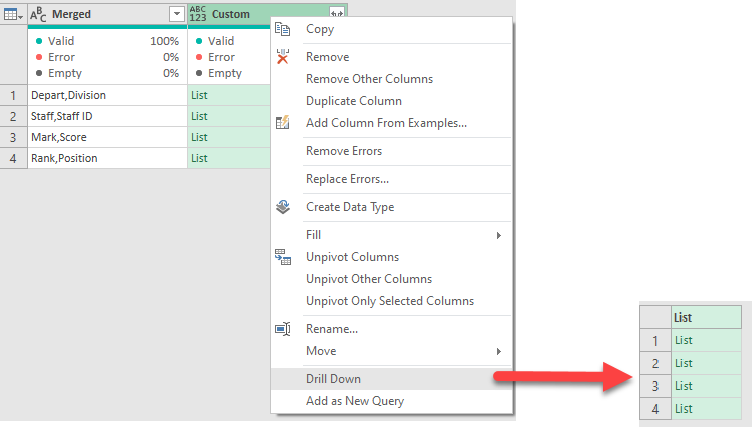
YESSS! I had just created the list of list that I have been looking for.
Then I renamed the last step from “Custom” to “NewColumnNames” (just to make the next step more readable).
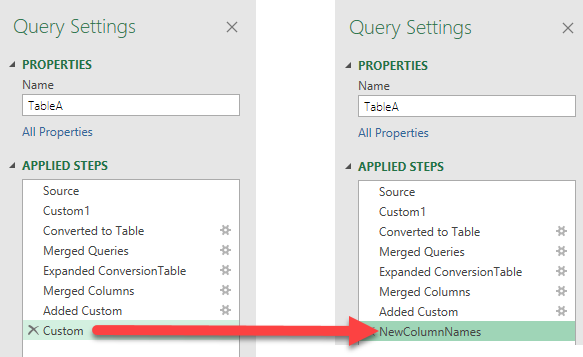
Rename Column Names dynamically
The final step has become easy. Do you still remember the auto-generated code for renaming columns?
= Table.RenameColumns(Source,{{"Depart", "Division"}, {"Staff", "Staff ID"}, {"Mark", "Score"}, {"Rank", "Position"}})
What we need to do here is to add a custom step with the same formula, but substituting the second hard-coded parameter by NewColumnNames.
Turn this
= Table.RenameColumns(Source,{{"Depart", "Division"}, {"Staff", "Staff ID"}, {"Mark", "Score"}, {"Rank", "Position"}})

into this

= Table.RenameColumns(Source, NewColumnNames)
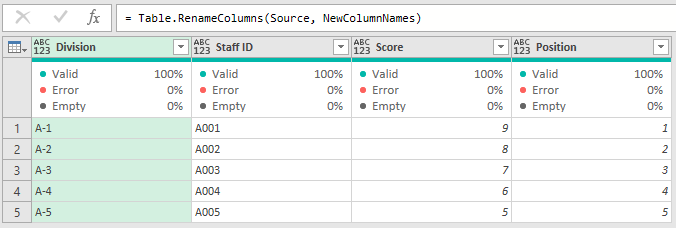
Can you believe it? It is done!
Testing the result
As always, we have to test the result to see if it is working as expected. Let’s change the conversion table and see what happens:
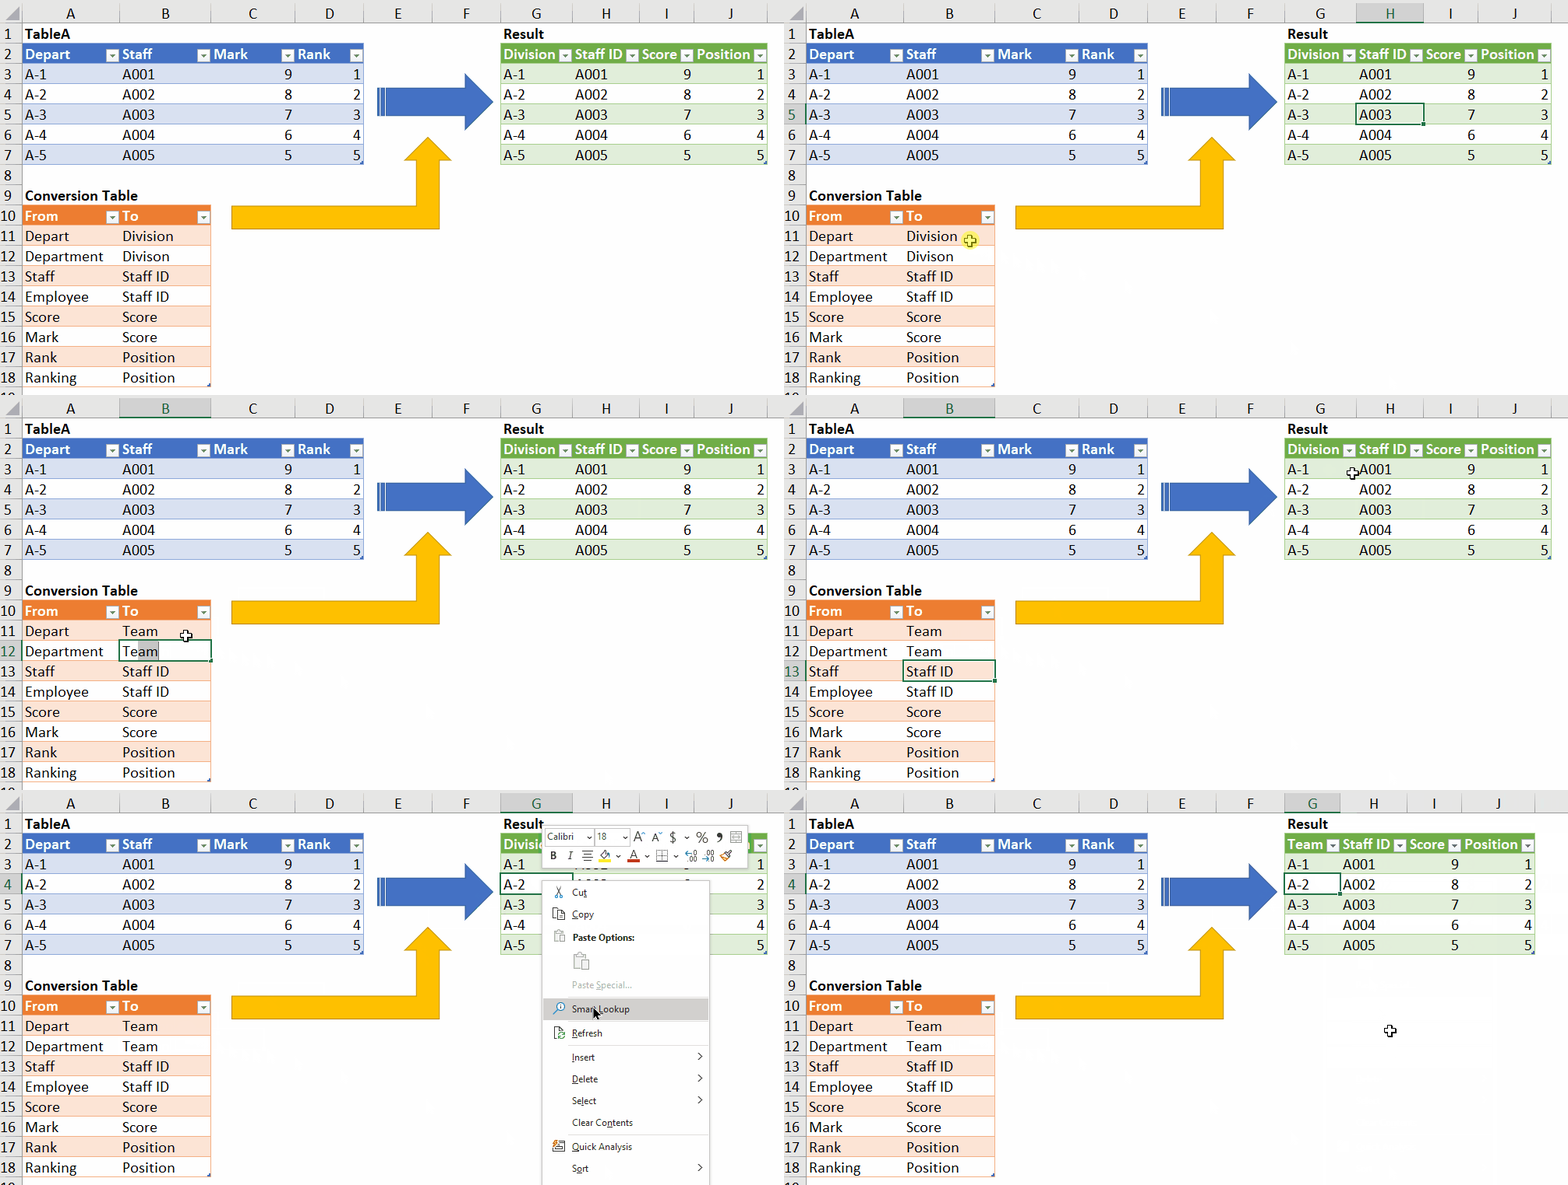
Now let’s change the headers and see:
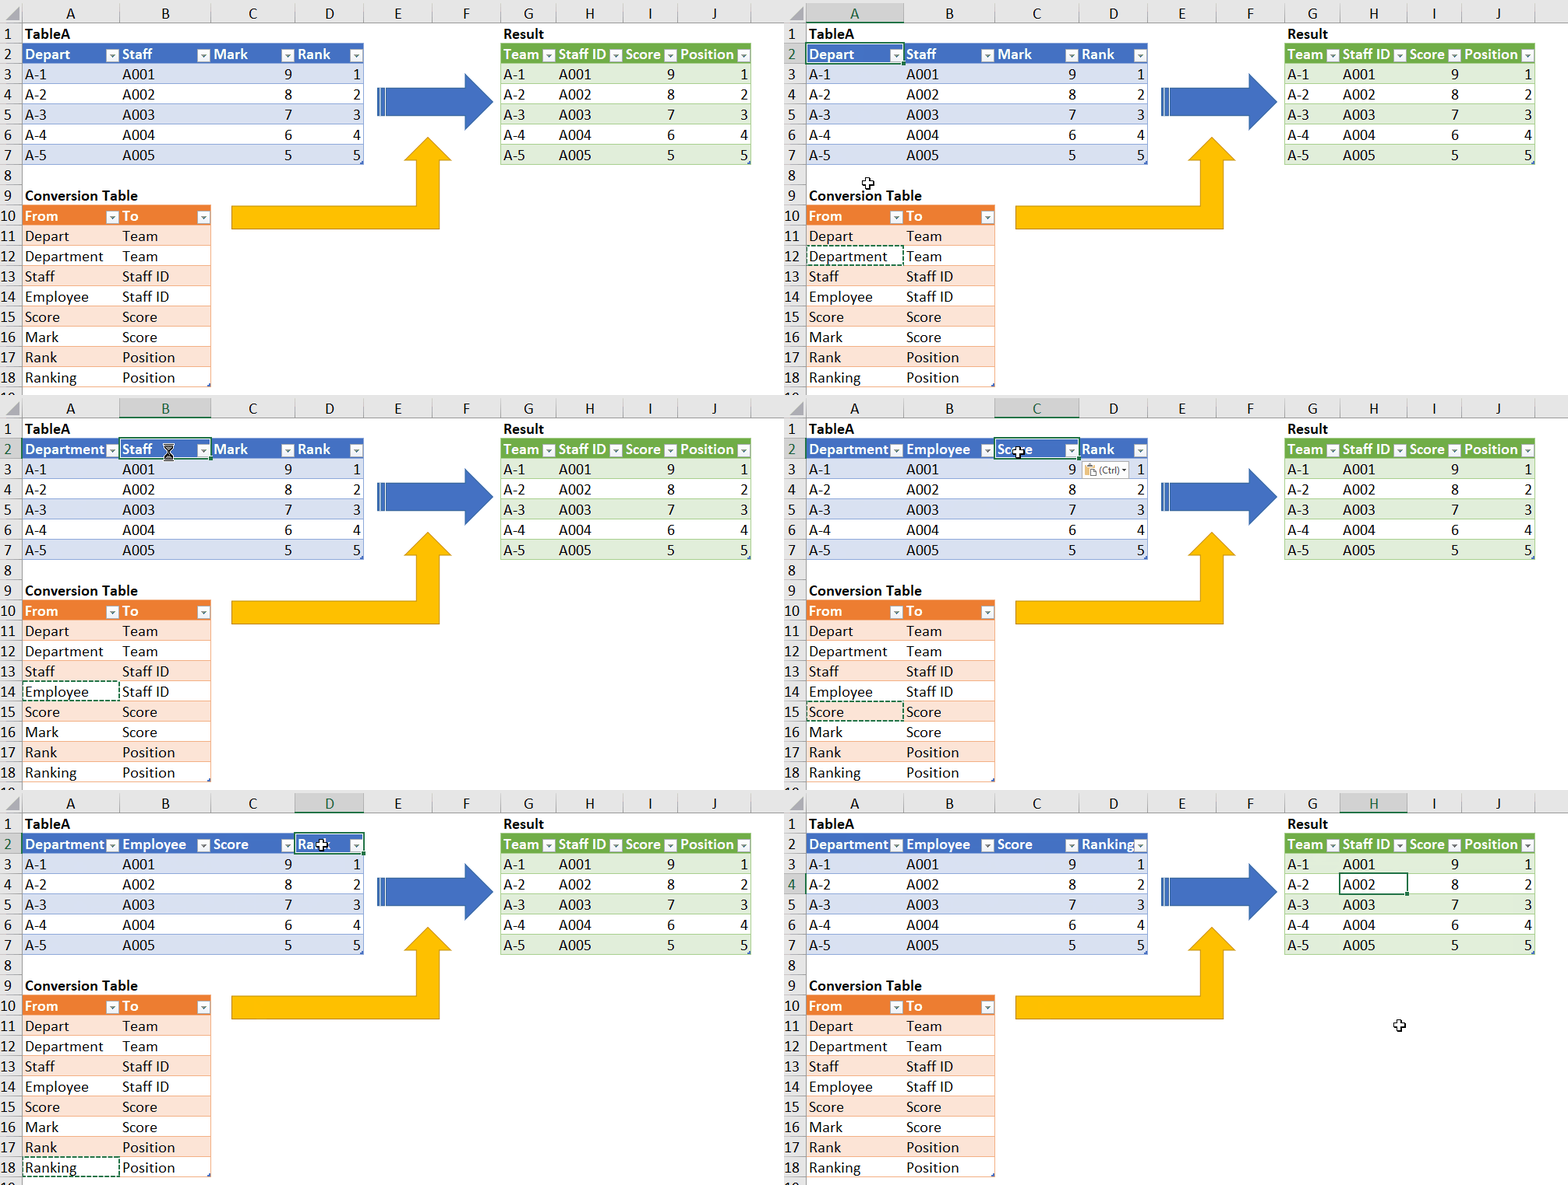
You may also download a sample file with the queries:
Application – Append tables with different column names
With this technique, we can combine workbooks with inconsistent column headers with ease. This would be better illustrated with a video, which is under production. Stay tuned! 😉


Thanks man, i have been searching for a solution for a while. Was exploring List.Zip and other ways, but this finally worked.
I make tutorial videos on youtube and would like to use your solution in a data cleaning tutorial, this was just the last missing step I could figure out.
I will make sure to give a shout out to your website and add link to this page in description as well.
Let me know if you are ok with that.
LikeLike
Glad it helped! As long as you explicitly cite the source, you are welcome to use my solution. Happy to share knowledge and experience, that’s why we write blogs and create videos, isn’t it? Kindly share with me your video when ready.
LikeLike
Wow that was so, sooooooooooo helpful.
Thanks a lot, helped me learn a lot about lists, and also about going on a tangeant in the code and coming back to an earlier step, had forgotten we could do that. Great post!
LikeLiked by 1 person
Thanks for your kind words! Glad it helps!
LikeLike
You are welcome! Glad it helps! 😀
LikeLike
Thank you so much for your detailed explaination. It perfectly works. I already searched for whole day and still cannot out solutions. You saved my life!!
LikeLiked by 1 person
Hello,you can use
Table.RenameColumns(Source,Table.ToRows(Table_column_names))
=> Table.ToRows(table as table) as list
LikeLike
Once you used ‘Text.Split’, you have already used an M-Code.
An easier way for generating a list of list would be by using the following code.
NewColumnNames = List.Zip ({ConversionTable[From], ConversionTable[To]})
For the Table.RenameColumns, you should use the optional parameter ‘MissingField.Ignore’. This to avoid errors in case of missing columns.
Ref. https://docs.microsoft.com/en-us/powerquery-m/table-renamecolumns
LikeLike
Thank you very much for your suggestions. That’s brilliant. With your suggestion, I can solve the problem in a more efficient (and direct) way.
You are right. I did use M Code for my solution. The codes I used can be “borrowed” from auto-generated codes via the UI. Only exception is Text.Split, I used that in the “Add Custom Column” step, which is “manageable” to me, and probably other users, hopefully 😁 .
Having said that the List.Zip and the MissingField.Ignore for Table.RenameColumns take the solution to the next level. Thanks again. I will put this in the bonus section of my video.
LikeLike