Note: This is a long post… 😉
Part 1 – What Power Query does for us in the process?

If you know about Power Query, you should know that combining files in a folder is a powerful yet simple task using Power Query, especially when there is a consistent pattern among all files. Like in the example above, there is only one worksheet “Sheet1” in each file. Moreover, all files share consistent layout with common column headers, which reside on row 1.
When new files come in week by week, a simple click of “Refresh” would get us the combined table for further analysis. As simple as that.
It worked like a charm until one day, your I.T. team changed the headers slightly… without getting consent from you (and all other users) 🙄
For whatever reason, the headers had been changed to below:

Excuse me? Breaking the headers from one row into two rows??? What’s the point of doing this? I have no idea but it happened. 😭
And you knew it… the query was broken.

The luckiest part is, the change was minor AND it’s confirmed that it will not changed anymore. Put it in other way, all the coming files will have two rows of headers, with the same data layout in the four columns in the same order in the future.
To fix the broken query, we could:
- Modify the query to fit table structure for “new” files and manually change the headers in all old files for consistence or
- Modify the query to fit the table structure for both new and old files
Which option would you go for?
If there is only one or two “old” files, I would probably pick option 1. What if there are tens of old files in place already? Option 2 is the preferred way. No doubt! 😁
Either way, in order to modify the query for combining files, we need to know what to modify, and more importantly where to modify.
Therefore it’s better to understand what is happening when we try to combine files in a folder using Power Query. This will be the focus of this blogpost.
You may download the following data files to follow along. Make sure you put them in a folder where there is nothing else.
To combine all data files in a folder, we go through the following steps:
Get Data

- Go to Data tab
- Open the Get Data pull down menu
- Select From File
- Select From Folder
- Browse the folder path where the data files reside (or copy the path there directly)
- Click OK
- Click “Transform Data” (or “Edit” in older versions of Power Query)
Combine all files
(Note: Currently there are four xlsx. files in the folder)

In the Power Query Editor
- Rename the Query to “CombinedTable” (or anything meaningful to you)
- Right-click the column “Content”
- Select Remove Other Columns (this step is optional; I am doing this for staying focus)
(Note: Assuming there are only relevant data files in the folder. Otherwise extra steps to filler out unneeded files are required)

4. Click the double-down arrows icon
5. Select “Sheet 1“
6. OK
As simple as that, we have four files combined

At this point, let’s pause and try to understand what Power Query did for us to combine all the four files.
The following shows an “enlarged” portions of “APPLIED STEPS” (on the right) and “Queries” Pane (on the left) of the Power Query Editor:

Did you know…
Step 3 onwards and a series of “Helper Queries” were created by Power Query automatically?
This is what we have BEFORE clicking the double-down arrows to combine files.

Once we click that icon to combine files, Power Query generates the Helper Queries (as showed on the left) automatically, which will be deployed in Step 4 showed below.

Let’s examine the Helper Queries
Before we dive in, let’s think about how we would do it manually to combine all data files in a folder. It will be something like:
- Open the first file in the folder;
- Go to the sheet/table/range where our data is;
- Do the transformation we need (e.g. define first row as header, remove a certain columns, merge certain columns, extract text from a column, etc…);
- Keep the “transformed” data for consolidation later;
- Open the next file and then repeat step 2 to 4;
- Repeat step 5 until the last file in the folder;
- Combine all “transformed” data into one big table
Make sense?
Indeed Power Query does the above for us by creating the Helper Queries.
Look at the “Sample File” under Helper Queries first:
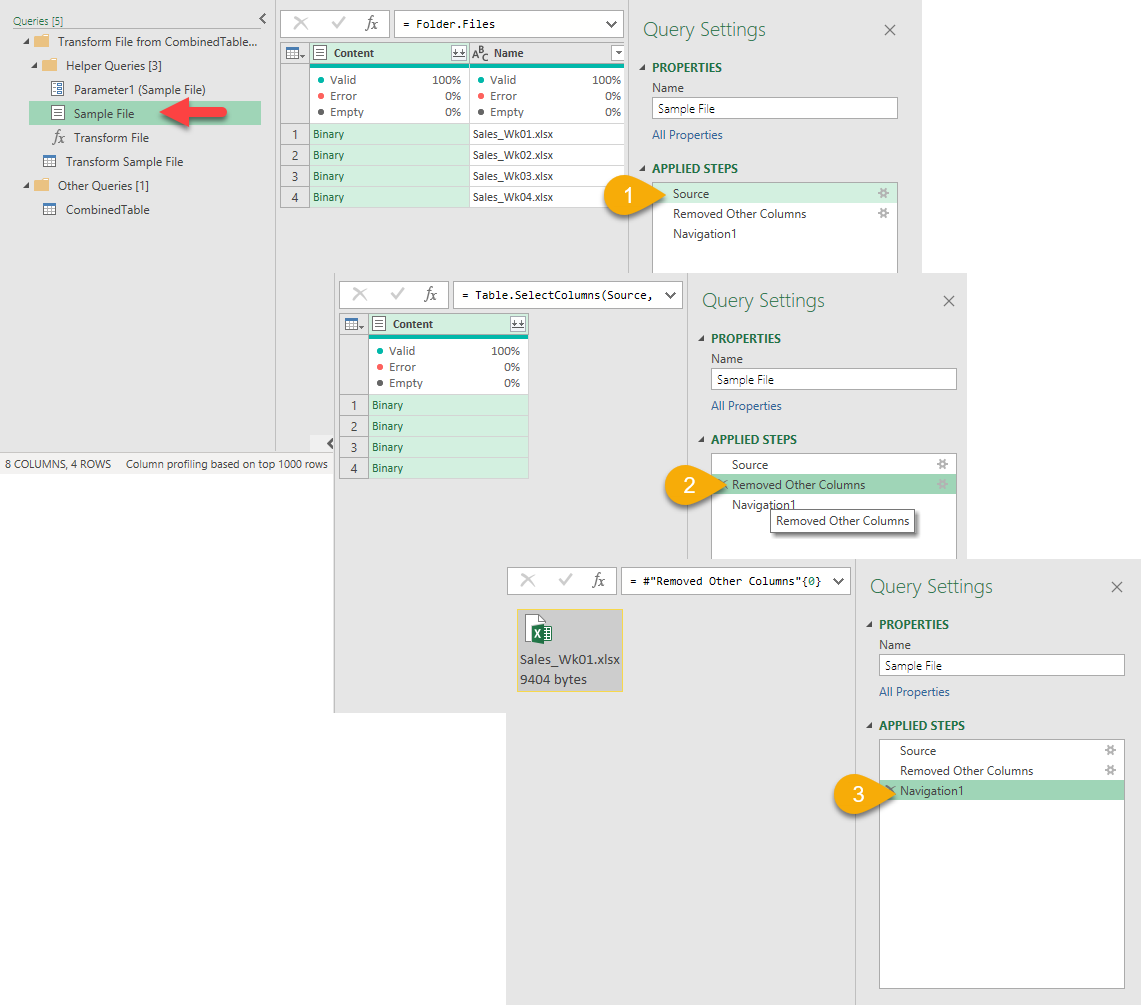
There are three steps for “Sample File“. In short, it is getting the first data file in the folder as the sample file. (We may manipulate this query to select a particular file as sample file, if needed.)

The “Sample File” selected is then turned into a Parameter, Parameter1 (Sample File), for later use.
Now we can move on to the “Transform Sample File” under Helper Queries.

In the first step (Source) of this query, we see that it is referencing to “Parameter1“. Sounds familiar? The “Parameter1” was derived from the “Sample File” we just discussed.
Now let’s look into the formula bar for th second step “Navigation”.
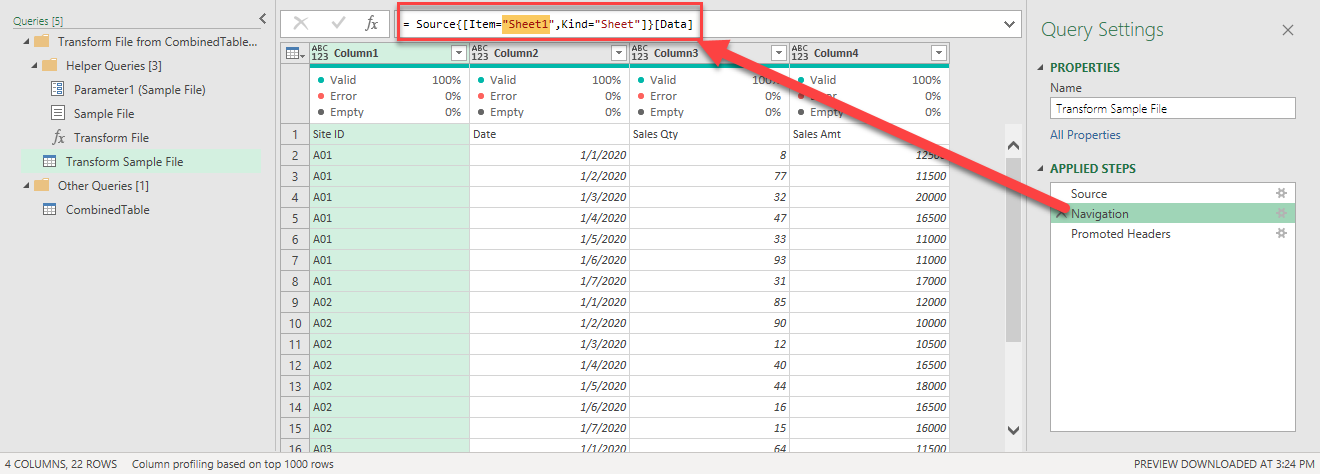
It is referencing to “Sheet1“. Does it also sound familiar to you? Did we instruct “Sheet1” somewhere before?
Yes, we did! We did it right after we clicked the double-down arrows to combine files:

Now we are ready to look at the “final” step under “Transform Sample File“. The “final” step that was generated by Power Query automatically is “Promoted Headers“.
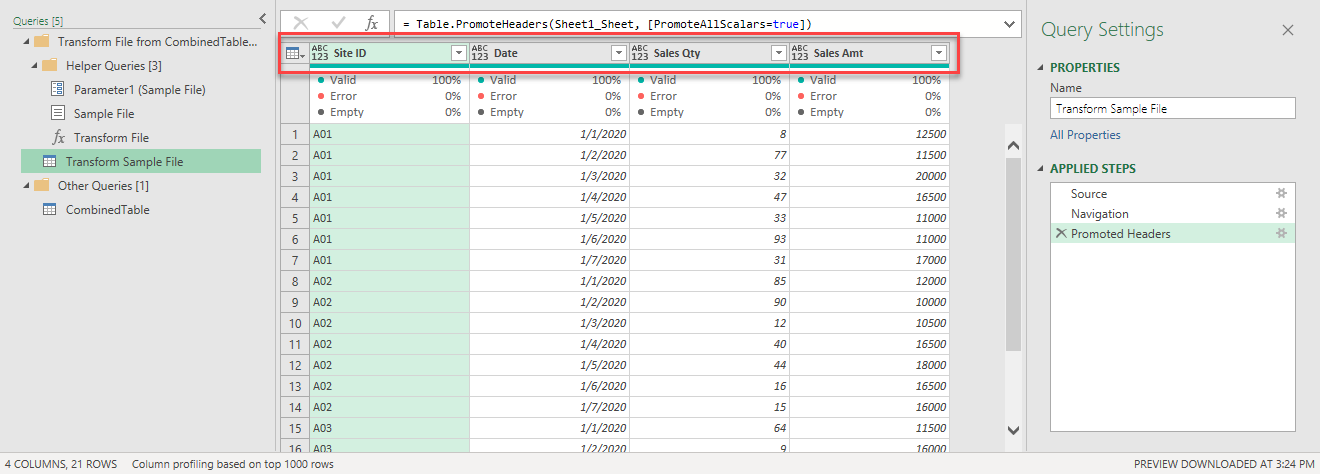
It is a fair assumption that all tables carry the same column headers in all data files if we want to combine them. As such, Power Query inserts this “Promoted Headers” step to set the first row of each table as headers, so that column headers will not repeatedly appear in final result.
It is important to note that we may add/modify/remove steps here in “Transform Sample File“. Normally we would (and should) add more transformation steps, e.g. get the Date of Week, Month, Quarter etc. from the Date column, and so on and so forth. (We are nevertheless not going to do so in this blogpost as that is not the key discussion point.)
As a rule of thumb, if you need to transform (or reshape) your data for combining files, do it in the “Transform Sample File” query.
Power Query then converts all the steps in the “Transform Sample File” query into a function ==> fx Transform File which will be used in the “CombinedTable” query where we started from.

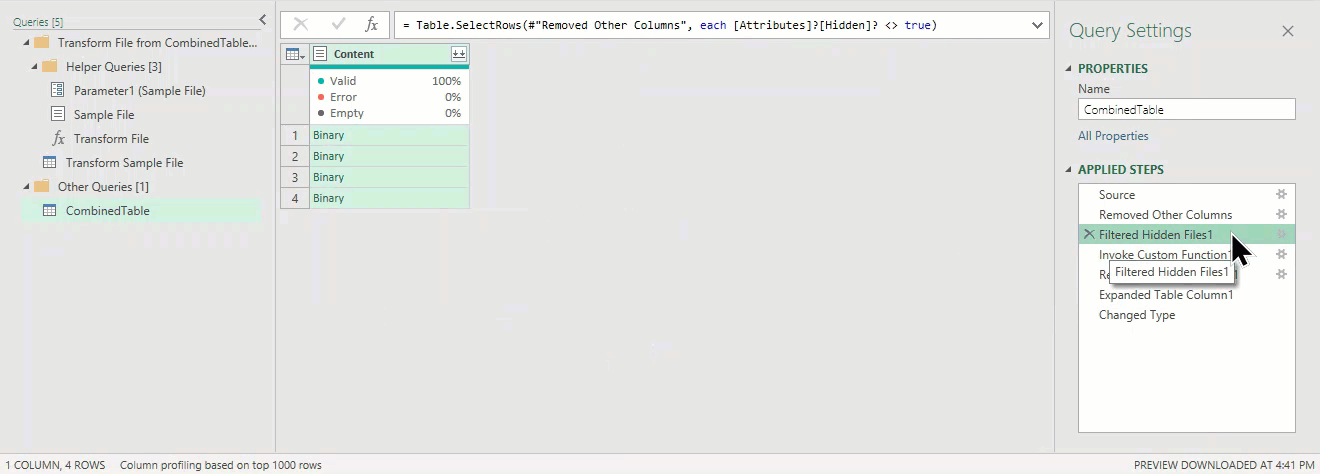
Let’s go back to where we start – the “CombinedTable” query

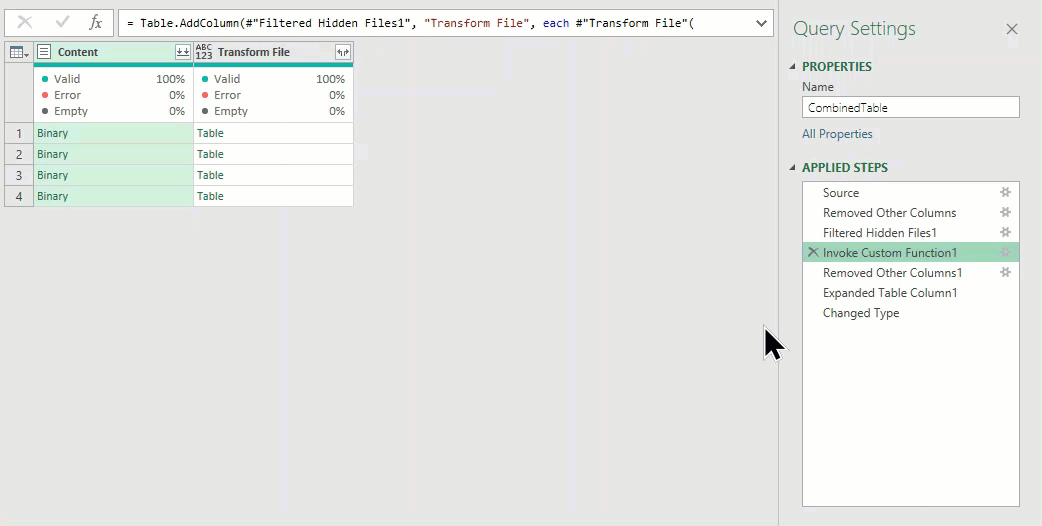
The 3rd step “Filter Hidden Files1” is added as a guard to filter out irrelevant files that may have. At this point, we have a column called “Content” with four rows. Each row contains a “Binary” file. These are the xlsx files we want to combine.
Now move on to the 4th step “Invoke Custom Function“
Please pay attention to what is generated from this step. When we move from the 3rd step to the 4th step, an additional column “Transform File” is created. Under this column are the “Table” from the corresponding “Binary” file. The following screencast shows the details:
Now, let’s double-click the “Gear” icon next to the step “Invoke Custom Function1” to learn more.

The following dialog box appears:

What the step does is to
- Add a custom column called “Transform File“
- In the custom column, invoke the function called “Transform File“… (remember this was auto-generated by Power Query before?)
- … by using the Parameter being fed under the column “Content“

In plain English, it means:
Hey Power Query, please apply all the transformation steps we did in the “Transform Sample File” query to the Excel (Binary) files listed in the Column “Content”.
As a result, Power Query looks into the four Excel files, apply the same transformation steps to the four files, and return the four “transformed” tables as a result, and put them under the column “Transform File”.

The remaining steps are straight forward.
The 5th step “Removed Other Columns1” removes the column “Content”, leaving only the transformed tables there.
The 6th step “Expanded Table Column1” (essentially the action of clicking the “left/right arrows” icon on the column header”) combines the “transformed” tables into one table.
The 7th step “Changed type” defines the data type for each column as a result.
I know it’s a bit overwhelming. It took me quite some time to understand what is going on for all those helpers queries and the steps generated by Power Query. Once I’ve got it, I feel comfortable (and confident) in modifying queries to suit different situations.
To recap, when we click on this icon:

The following happens that set the core for combining files:
- The first data file in the folder is selected and set as Parameter;
- Transformation steps for the sample file are recorded and then converted into a function;
- A custom column is added by invoking the function created;
- Power Query gets and transforms data from the corresponding Binary files into Table for later consolidation

That’s all for the basic of Combine Files using Power Query.
Why does it matter?
Honestly, you don’t have to understand all of the above in most situations. As long as all data files share common structures/layouts, you should be able to refresh the query again and again when new files come into the same folder. And you should not experience any errors during the process.
Having said that, there are always unexpected scenarios in real world. As mentioned in the beginning of the post, what if the source of data decides to revise the column headers?
Having a thorough understanding of the above would absolutely help us identify the errors and know where and how to modify the query(ies). This will be discussed in the next post.
Stay tuned. 😉


