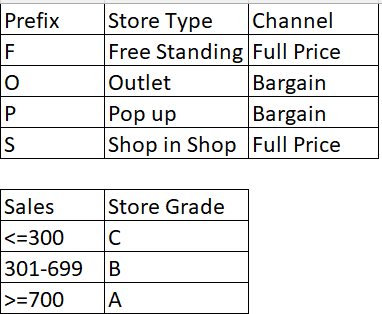
Situation:
We are given a simple table on the left. We need to add three additional columns based on the prefix of the StoreID, and the sales values. The table on the right is the expected outcome.
And here’s the logic:

IF function would probably be the top-of-mind solution. IF is a common function in Excel. It’s widely used for adding conditional columns. Nevertheless, such task is super easy with Power Query as user can achieve it via user interface in Power Query Editor. No formula writing at all. 😉
You may download a sample file to follow along
Let’s watch it in action:
If you prefer reading to watching, please continue to read.
Get data from Excel table into Power Query Editor
Select any cell in the table, then
- Go to Data tab
- Click From Table/Range

Note: This is an Excel Table named tb_Sales
Adding column of Store Type
In the Power Query Editor,
- Select the column StoreID
- Go to Add Column tab
- Click Conditional Column

The “Add Conditional Column” dialog box opens
- Input the new column name
- Set the conditions (tip: click the “Add Clause” for multiple conditions. Note: Power Query is case-sensitive, i.e. “f” is different from “F”)
- OK

Tip1: There are different operators to select from

Tip2: For the value to compare to and the Output value, we may input a value or reference to another column in the table

🙌 Congrats! First conditional column added!

Power Query wrote this following (M) formula for us:
= Table.AddColumn(#"Changed Type", "Store Type", each if Text.StartsWith([StoreID], "F") then "Free Standing" else if Text.StartsWith([StoreID], "O") then "Outlet" else if Text.StartsWith([StoreID], "P") then "Pop Up" else if Text.StartsWith([StoreID], "S") then "Shop in Shop" else "Other")
Imagine if you need to write it by yourself from scratch. 😅
Adding column for Channel
With the new column “Store Type” added, we may add another conditional column based on it.
Repeat the “Add Conditional Column” steps above with the following conditions:

Here we go!

Adding column for Store Grade

Note: Did you notice that a different list of operators is available for selection when the column is numeric?
As simple as this!

Finishing touch
- Rearrange the columns
- Define data type for each column

Note: Hold Ctrl key to select multiple columns
Now, we have enriched the data from something quite raw to something more meaningful. It’s time to Close and Load and continue your analysis!


