This is a guest post by Aprajita of ExcelChamps.
Let me ask you something.
Suppose you are presenting data to the management and suddenly an important point strikes your mind.
Will you look around for a piece of paper and pen or ask someone around to note down the points of discussion?
Please share your answer in the comment section with me. If the answer to my question is yes, trust me you need this article.
In Excel 2019 and Office 365, Microsoft has introduced a new tab called “Draw”.
You know what, when I started making PowerPoint presentations, I wonder if I could just draw or write something on the screen…
…and it gets automatically converted into text or shapes.
With Draw TAB, all of these things are possible now, and in this post, we’ll be exploring all draw tab in detail and exploring it’s all the features.
Note: Draw Tab is the same in all the Office Applications (Word, Excel, and PowerPoint).
So let’s get started…
Hey listen, don’t forget to Subscribe to MF Wong’s YouTube Channel.
How to Get Draw Tab on Ribbon
To get started with the Ink feature, all we need is a Draw toolbar in quick access ribbon.
If you are using a touch-enabled device, this toolbar will be active in the ribbon else you can enable it manually following a few steps.
File ➜ Home ➜ Options ➜ Customize Ribbon ➜ Select Draw ➜ Click OK.
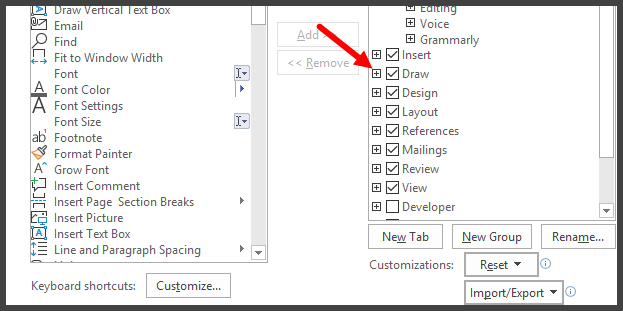
And you have your new Draw Tab.
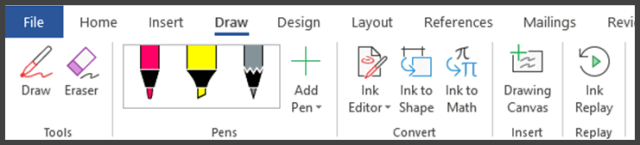
All the features are categorized as Tools, Pens, Convert, Insert and Reply.
- Tools option gives you the power to draw your imagination on the document using pens, a highlighter, and pencils.
- Convert changes your raw drawings to the inbuilt shapes, mathematical equations and helps you to edit the documents.
- Insert gives you the freedom to insert a new element called canvas into your document.
- Ink Replay, as the name suggests helps you to replay all you did with the INK feature.
In this post, we will explore all these options in detail (Points 7, 8, and 9 discussed are only available in PowerPoint).
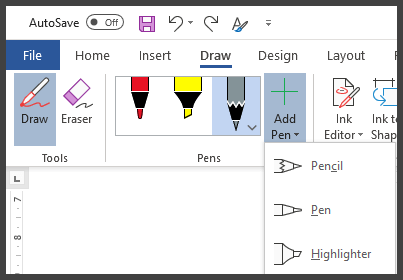
1. Draw
This feature simply converts your screen to a canvas and your cursor into the pen. Click on Draw and select the type of pen you wish to use.
There are 3 types of pens named: Pen, Highlighter, and Pencil available in different colors, thickness, and effects.
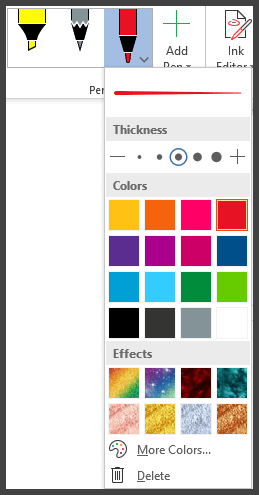
In order to make the most of the Draw menu, we need to learn more about its components.
From the drop-down, you can select the color, thickness, and effects for your pen, pencil, or a highlighter.
Let’s try this out:
We are using a pen with a red color to write a text “Be Excellence” which is an amazing blog to learn a lot about Excel.
I hope my handwriting is not bothering you.

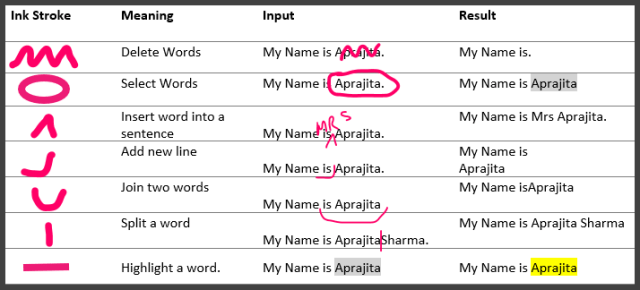
2. Ink Editor
Since Draw feature allows you to write and draw freely, INK Editor gives you the freedom to edit a document.
Ink editor is a blessing for those who use touchpads or digital pens.
This feature helps you to edit your document directly by your pen, finger (touch-enabled screens) or mouse using a few strokes as you write on a notebook.
Click on the Ink Editor, your pencil or pen will be enabled automatically. Let’s try a few:
3. Ink to Shape
How about drawing shapes using the mouse pointer, fingertip or digital pen.
Now you must be thinking that who can draw clean and professional shapes using a mouse or pen or fingertip.
It is almost impossible to draw shapes perfectly at least in one go.
This feature don’t help you draw perfect shapes but converts your hand-drawn raw shapes into perfect shapes.
Surprised!!
Let’s draw a few shapes:
Activate Ink to shape by clicking on it.
We have tried drawing 3 shapes a triangle, circle, and a rectangle.

All the raw are converted to professional shapes.

Oh!! it couldn’t recognize my circle.
That means I need to work on my drawing skills. But it is converted to the nearest shape it could recognize.
4. Ink to Math
As the name says, Ink to Math allows you to enter a mathematical equation into your document.
Click on the Ink to Math next to Ink to Shape and a dialogue box appears.
Start writing in the yellow portion as mentioned in the screenshot.
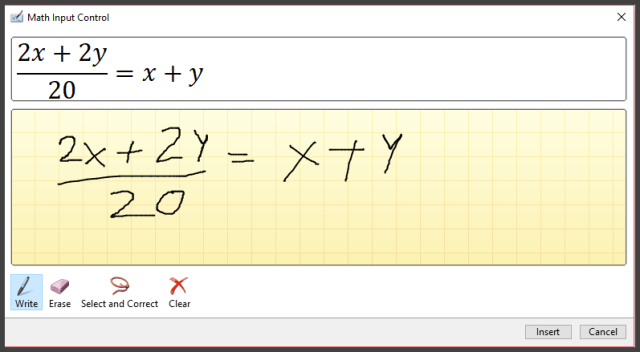
It will automatically convert your inputs to mathematical equations.
You can further erase, clear, insert your equation in the document.
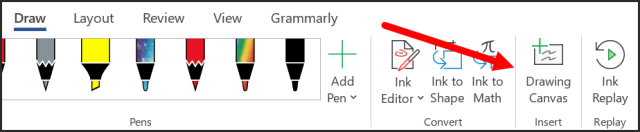
5. Drawing Canvas [Only Word]
As this feature is categorized under insert, this allows you to insert a drawing canvas into your document.
Place your pointer where you wish to insert a drawing canvas and click on the Drawing Canvas button.
Boom!! The drawing canvas appears.
You can edit the canvas sheet, fill color, outline and insert shapes into it. Also, you can align it with text by clicking on the top right of the drawing canvas.

6. Ink Replay
This feature helps you to review your drawings, shapes and ink strokes step by step. Once you are done with your drawings, just click on the ink replay button.
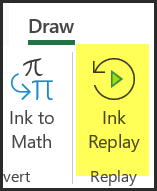
All you are drawing are replayed as you watch a video. You cannot control the speed but can surely pause, forward and rewind.
All the above-discussed features are common to both Microsoft Office and Microsoft word.
Here are a few which are only available for PowerPoint-like Lasso Select, Ruler, and Ink to text.
Let’s start with PowerPoint now. Again, ensure you have an updated version of Microsoft Office 365 or Office 2019.
7. Lasso Select
This option helps you to select all your drawing in one go. As you click on the Lasso, you will be able to make a free selection around your object (text, shape, etc.)
In other words, it’s a free type selection that you can control with the mouse pointer, fingertip or digital pen.
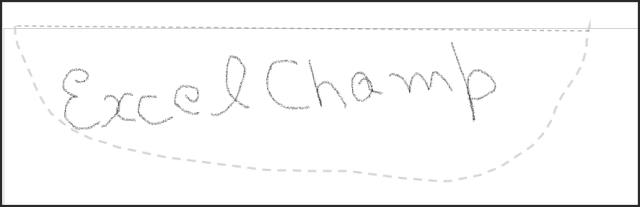
Suppose we write a text “Excel Champs” on the slide. Let’s see what Lasso select does:

This grey irregular selection around the text is Lasso select.
Now we have got 3 options when we click on the top-right icon of the selection: Ink, Convert Text & Shapes and Convert Math.
You can convert the selection into Shapes, text or a mathematical equation by selecting any of the 3. We selected “Convert text and Shapes”. Our text is converted.

8. Ink to Text
Ink to Text recognizes and converts handwritten notes to text.
Suppose you are delivering a presentation and suddenly something important strikes into your mind.
You start making the necessary changes or add notes using a digital pen on the ppt slides.
Now, either you have to type the notes again or select Ink to text.
I would rather choose Ink to text than typing the text. Ink to text will immediately convert your handwritten notes to text.

Once you have written the notes or text, click on the Ink to text feature. Lasso select option will automatically be activated. Make the selection and your text is ready.

You can draw the complete slide with the free hand and then convert it into a professional slide using Ink function. There is no limitation to ideas now. Your ideas can now be converted to powerful slides by a few clicks.
9. Ruler
Until now we have been talking about the text, shapes & drawings, etc.
But what if you need to draw a straight line. It was so easy to draw lines in our school days using a scale or a ruler.
Can you imagine using the same ruler in your slides? If No, then you must know that PowerPoint has made it possible.
Now you can do it with just one single click. Yes, with Ruler this can be done with a single click in PowerPoint…
Also, you can align your object in a row using the ruler.
For using Ruler, activate by clicking on the Ruler button. A scale will appear on the screen
Select the type of pen or pencil you want to use. Draw a line as you draw on a notebook or a paper.

Again, click on the ruler button so that it disappears from the screen. You can drag and rotate the ruler as per your requirements.
About the Author

Aprajita is the Co-Founder of ExcelChamps. She has an MBA in Sales and Marketing and has been using Microsoft Excel for the last 8 years. Her journey started from learning a basic pivot table from Google which made her fall in love with Excel.
Check out this list of Top Excel Tips for 2019 from ExcelChamps
MF’s comments:
What an amazing post outlining the features of Draw. As Aprijita mentioned, using a digital pen with touch screen is ideal for Drawing. 🙂
Office 365 is leading the way. I hope majority of Microsoft users is switching to Office 365 soon in order to enjoy the benefits of latest technologies. E.g. Dynamic Arrays (currently available to the Insider of Excel 365) is simply awesome. It empowers all users with simplicity.
Special thanks to Aprajita for mentioning BeExcellence and my YouTube channel in the article.


this is really a good informative website.. that i have ever every seen. i have got a lot of good knowledge from
this website and i am waiting for the next blog which could be more informative
keep it up and give us good information
for more information Office 365 Email Signature
LikeLike
You said it right MF, “Office 365 is leading the way.”
LikeLike