There are many not-so-easily-understood terms in Excel. “Text to Columns” should be one of them. Probably due to the name of it, Text to Columns is not a common tool for many Excel users. But indeed, if you know what it does, you will love it.
What is Text to Columns?
It is one of my best buddies in Excel.
It is a great tool to extract specific text from a text string without the use of a single formula. It is a great news for those who are not familiar with formula yet, isn’t it?
When you hover your mouse on the icon of Text to Columns under Data Tab on Ribbon, you will see the description about it…

Is it much clear now?
Tip: You may see a better description and sometimes even tip of using a tool when you hover your mouse onto its icon on Ribbon. Try the same to Format Painter.
Most of the time, we will use a “Delimiter” for Text to Columns. And the “Fixed width” is somehow forgotten. In some occassions, “Fixed width” is very handy and useful when we deal with text string with constant pattern.
In this blogpost, I will focus on using “Fixed width”.
Let’s put it into action
You may download a Sample File – Text to Columns to follow through.
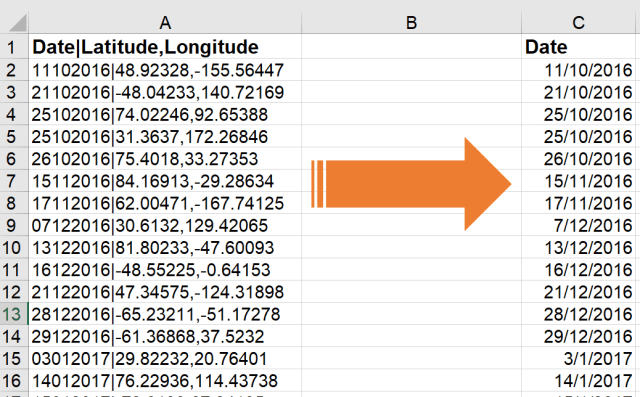
The task (to extract the date portion, and turn it into real date) is simple from the point of view of requestor, most of the time your boss. 🙂
Nevertheless, if you are not familiar with text manipulated functions like LEFT, MID, RIGHT…, the task may be a challenge to you.
The good news is: With Text to Columns, this task can be done with just a few clicks… Wanna count how many clicks required?
Here’s the step-by-step instruction:
- Select the range of cells
- Go to Data –> Text to Columns
- In the following wizard: Select “Fixed width“, then Next.

- At the preview window, click where you want a column break.
- The next step (3 of 3) is the most magical step of Text to Columns. It allows user to set certain data type, which could be extremely useful. In our case, we need to tell Excel that our data are Date in DMY format. (Note: If your data is in MDY format, select MDY instead)

- As we want the date portion only, we click on the other column and then select “Do not import column (skip)“
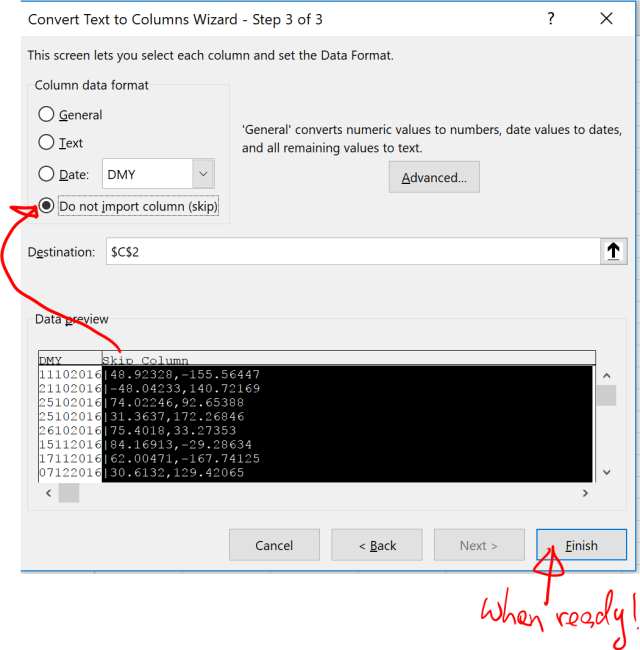 Tip: I have changed the “Destination:” to $C$2 because I want to extract the date from the original data, that I want to retain.
Note: By default, the Destination is set to the upper left cell of the range selected. By this default, original data will be overwritten by the “extract” texts.
Here we go:
Super easy, isn’t it?
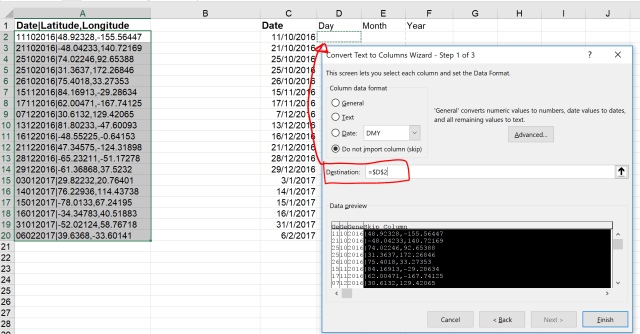
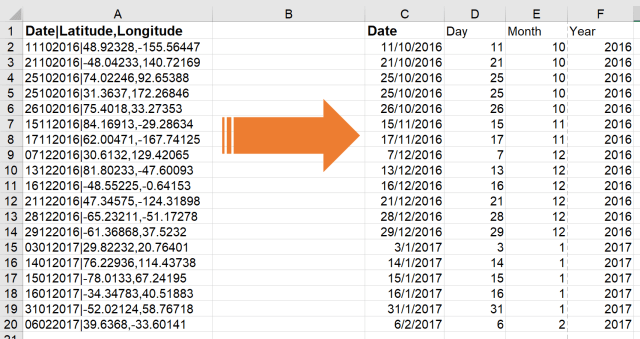
Because we are dealing with text string with constant pattern – Date with 8-digit in DDMMYYYY format, “Fixed width” does the job nicely. Even if we want more, e.g. have DD, MM, YYYY extracted into three different columns. What we need is just a little twist in Step 2 of 3 in the Text to Columns Wizard:

And don’t forget to change the Destination:
As simple as this! 🙂
With this technique, we can extract any specific portion of fixed length from a text string easily. E.g. 4 characters on the 5th position, 1st two characters, etc.
How about if we also need Latitude and Longitude?? Apparently, they are not of “Fixed width” because of the negative sign…
No worry! Did you know that we have the “Delimited” option in Step 1? Let’s talk about it in next post. Stay tuned.
You may also like:
Other posts related to Text to Columns


