… in creating dynamic drop-down with conditions
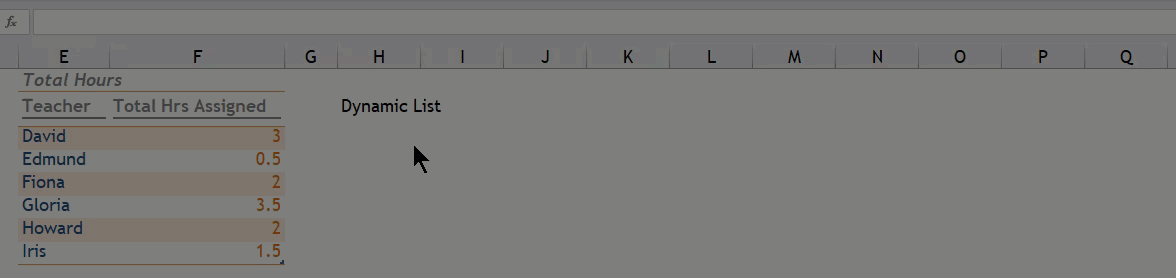
Making a dynamic drop-down list is not difficult. It may require multiple steps, helper formula and/or helper tables though. And the number of helper tables depends on the complexity of the requirement. I wrote a blogpost for a job-assignment task more than 5 years ago. The requirement is simple: show the teacher with least hours of classes assigned to on top of a drop-down list… like the screen cast show below:

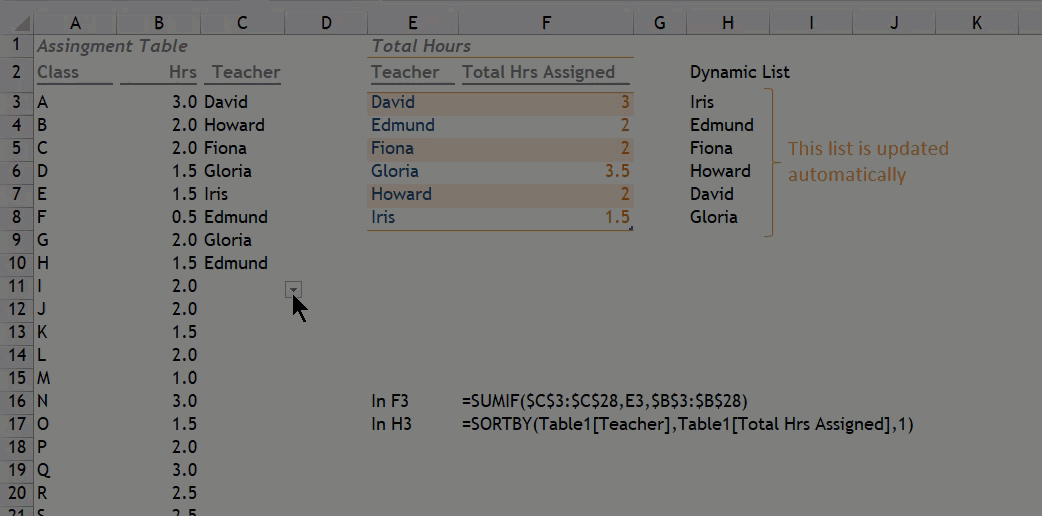
See!? The drop-down is changing according to the total hours assigned, as calculated on column F.
With dynamic arrays, this task is super easy.
You may download a Sample File to follow along.
Note: As of today, Dynamic Arrays is available to Excel for Office 365 Insider only
Step 1 – Setup the formula to calculate the total hours assigned to a teacher
In F3, input the following formula and copy down
=SUMIF($C$3:$C$28,E3,$B$3:$B$28)

Note: This step is required regardless of which Excel version you are using. 😉
Step 2 – Step up the dynamic array that is sorted by total hours assigned
In H3, input the following formula
=SORTBY(Table1[Teacher],Table1[Total Hrs Assigned],1)
'Note: The range E2:F8 is converted to Excel Table, named Table1
This SORTBY function is simply awesome and super intuitive. You can read it as
Excel, please Sort the column [Teacher] by [Total Hrs Assigned] in ascending order
(1 in the third argument means ascending; -1 means descending)
Step 3 – Step up the drop-down via Data Validation
- Select the range where you want to have the drop-down
- Go to Data tab
- Click Data Validation
- Select List
- Input =$H$3# (Note: The # sign is the cannot-miss magical ingredient here)
- OK
Note: this step is required regardless of which Excel version you are using. The only difference is what to input in step 3.5

It’s all SET and DONE!
And the best part is… when we have new teacher added to the list, we don’t have to change any formula. The dynamic array and Excel Table work in perfect harmony. 😁
Watch this:
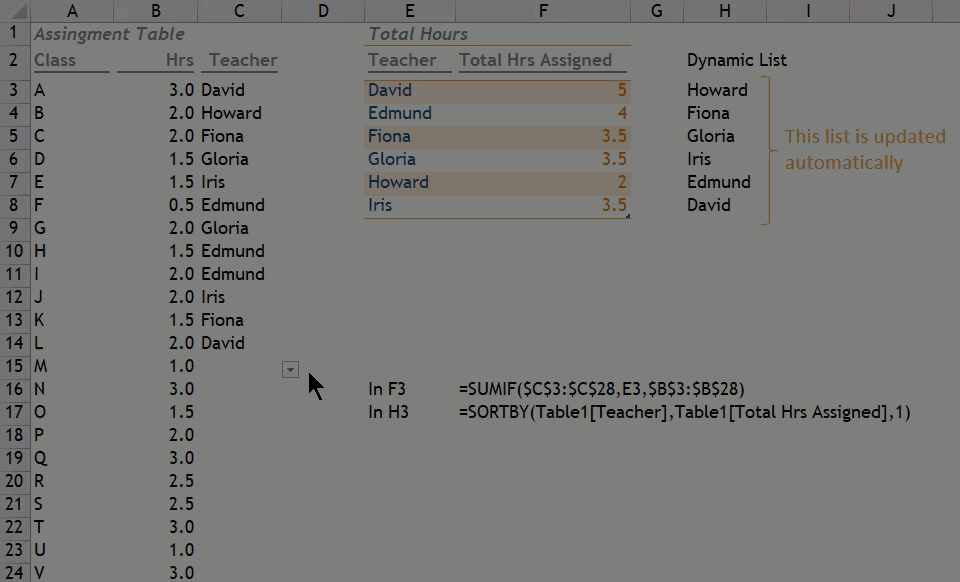
Isn’t it cool?
As mentioned before, Step 1 and 3 are required anyway. What makes the huge difference is the step(s) in-between. Before dynamic arrays, I needed four helping formula to achieve so. With dynamic array (in Excel 365), this task becomes so simple.
What do you think? Please leave your comments. 😉


